
Saludos. Les vengo a presentar un trabajo que ya tiene meses de hecho y se me había pasado publicar. Les cuento: por WhatsApp me escribió un joven que buscaba una pieza personalizada para su pareja, que no era más ni menos el logo del emprendimiento de ella,
El llevaba tiempo buscando, debido a que a los orfebres y joyeros que les proponía hacer la pieza no sabían cómo resolver el logotipo, porque este está basado en una triqueta celta modificada. Esta figura es un nudo celta pero más complejo, por el circulo que lleva en el centro, es un reto para hacerlo cortado sobre metal; pensé que podía transformarlo o probar con ensanchar las líneas y que las líneas sean la parte sólida de la pieza, como decir que las líneas sean plateadas y que el vacío de la pieza jugara con la superficie de ropa o piel donde se luciera. Bueno, así fue mi gran razonamiento.

Arriba pueden ver el logo que me envió, así que la idea que tenía la fui desarrollando en el programa de edición de imágenes vectoriales Inkscape, hasta que llegue a la versión final y al cliente le gusto.
Puse que pieza fuera un tamaño de 2.5 cm más o menos y pase a imprimir. Ahora les daré una breve lista de elementos entre materiales, insumos y herramientas que use:
Lámina de 0.75 mm de bronce.
Dremel.
Lijas número 240, 360 y 400.
Fresa para abrir huecos de 0.75 mm
Pinza redonda
Arco de Segueta y pelos o sierras 3/0
Limas.
Soldadura Harris 0 plata y soplete.
Motor de banco con sus adaptaciones para poner los discos de pulir, Disco de tela, cera de pulir.
Aproximadamente es lo que use para esta pieza. Básicamente está figura se basa en la técnica del calado o corte con la segueta allí radica su complejidad.
PROCESO
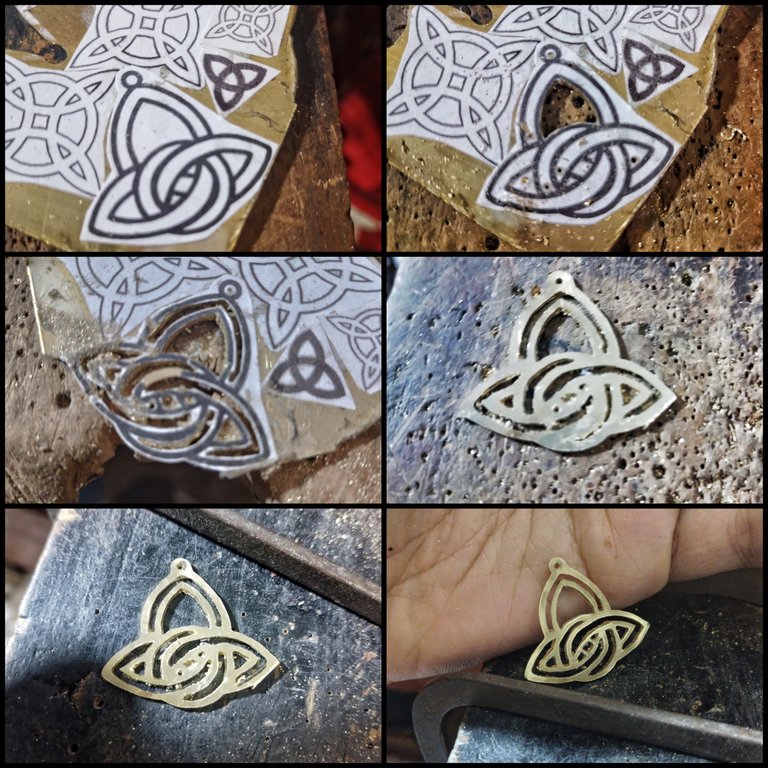
Pegué la imagen sobre la lámina ya limpia, usé pega blanca para esto. Una vez ya bien pegada, empecé a abrir los huecos internos con ayuda del Dremel y la fresa de 0.75 mm. Ahora agarro la segueta y le monto la sierra 3/0. Empiezo a realizar los cortes de modo tranquilo. Para agarrar confianza empecé con una de las partes más grandes, se puede decir que fue el calentamiento. Después pasé a los espacios más pequeños. Traté de no pasarme de los límites de la línea negra; en este caso es mejor que sobre a pasarme y dañar la pieza.
Continué los cortes por la silueta exterior. Quité la impresión pegada con agua. Para que sepan, estos trabajos pueden ser agotadores, por eso descansé un rato, porque tenía que estar fresco para mejorar los detalles.
Ahora toca ver cómo se mejora la pieza, ya que hay que corregir las irregularidades. Para esto uso igual la segueta. Debo tener mucha paciencia e ir cortando y viendo cada detalle, pero poco a poco se va logrando.

Ya verificados los cortes, toca lijar. Allí empiezo con la lija 240. Para poder ver mejor los detalles, tocaba ponerle la pieza que será por donde pasará la cadena. Para esto, agarré un recorte de bronce más o menos del tamaño que necesitaba y con la lima le fui dando forma para encajar en el hueco. El doblez de la forma lo hice con una pinza redonda de joyería. Inserté en el hueco y luego soldé cuidadosamente.
Ya después de soldar, limé todos los residuos de soldadura e hice el último pase de lija empezando por la 240, a la 360 y, por último, la 400.
Por último, está el pulir. Para esto me ayudo usando un alambre para agarrar la pieza y que no se me zafe. Entonces agarro la pieza con el alambre y me dirijo al motor de banco. Le pongo el disco de tela, enciendo el motor y pongo cera sobre la superficie del disco en movimiento. Entonces acerco la pieza al disco y voy puliendo poco a poco. Cuando termino, limpio con agua caliente, jabón de lavaplatos y un cepillo...
Después de terminado, lo mando a bañar en plata.
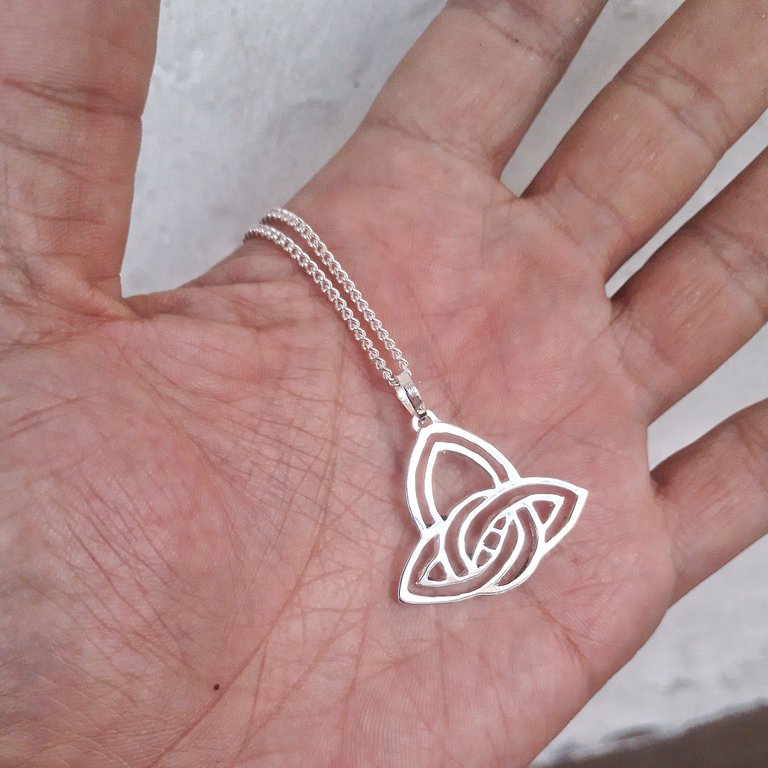

Allí arriba pueden apreciar un poco la pieza finiquitada, al señor le encantó como detalle de regalo a su pareja. Espero que a ustedes le guste como quedó está pieza. Si gustan también me pueden buscar en Instagram como M16ueljoyas
++++++++
English / Google Translate
Greetings. I'm here to present a project that I finished months ago but had forgotten to share. A young man contacted me via WhatsApp looking for a custom piece for his partner—specifically, the logo for her business.
He had been searching for some time because the goldsmiths and jewelers he approached didn't know how to work with the logo, as it's based on a modified Celtic triquetra. This symbol is a Celtic knot, but more complex due to the circle in its center, making it a challenge to cut from metal. I thought I could transform it, or try widening the lines so they become the solid part of the piece—like making the lines silver and letting the empty space interact with the surface of the clothing or skin where it would be worn. Well, that was my grand idea.
Above you can see the logo he sent me, so I developed the idea I had in the vector image editing program Inkscape until I arrived at the final version, which the client liked.
I set the size of the piece to approximately 2.5 cm and proceeded to print. Now I'll give you a brief list of the materials, supplies, and tools I used:
0.75 mm thick bronze sheet.
Dremel tool.
240, 360, and 400 grit sandpaper.
0.75 mm hole saw.
Round-nose pliers.
Hacksaw frame and 3/0 saw blades.
Files.
Harris 0 silver solder and torch.
Bench grinder with adapters for attaching polishing discs, cloth disc, and polishing wax.
This is approximately what I used for this piece. Basically, this figure is based on the technique of fretwork or sawing with a hacksaw; that's where its complexity lies.
PROCESS
I glued the image onto the already cleaned sheet using white glue. Once it was firmly glued, I began to open the internal holes with the Dremel and the 0.75 mm bit. Then I took the coping saw and mounted the 3/0 blade. I began making the cuts calmly. To gain confidence, I started with one of the larger sections; you could say it was a warm-up. Then I moved on to the smaller spaces. I tried not to go over the limits of the black line; in this case, it's better to cut too much than too much and damage the piece.
I continued cutting along the outer outline. I removed the glued-on print with water. Just so you know, this kind of work can be exhausting, so I took a break because I needed to be refreshed to refine the details.
Now it's time to see how the piece can be improved, since the irregularities need to be corrected. I'm using the coping saw for this as well. I have to be very patient and keep cutting and checking every detail, but little by little, it's coming along.
Once the cuts are checked, it's time to sand. I'm starting with 240-grit sandpaper. To see the details better, I had to attach the piece that will hold the chain. For this, I took a piece of bronze roughly the size I needed and shaped it with a file to fit the hole. I bent it into the desired shape using round-nose jewelry pliers. I inserted it into the hole and then carefully soldered it.
After soldering, I filed away all the solder residue and did the final sanding, starting with 240 grit, then 360, and finally 400.
Lastly, there's the polishing. For this, I use a wire to hold the piece so it doesn't slip. I hold the piece with the wire and go to the bench polisher. I attach the cloth wheel, turn on the motor, and put wax on the surface of the rotating wheel. Then I bring the piece close to the wheel and polish it little by little. When I finish, I clean it with hot water, dish soap, and a brush...
After it's finished, I send it to be silver-plated.
Above, you can see a bit of the finished piece. The gentleman loved it as a gift for his partner. I hope you like how this piece turned out. You can also find me on Instagram as M16ueljoyas
++++++++

