We asked grok to modify the original recipe Because we realized that we didn't have enough cream cheese.
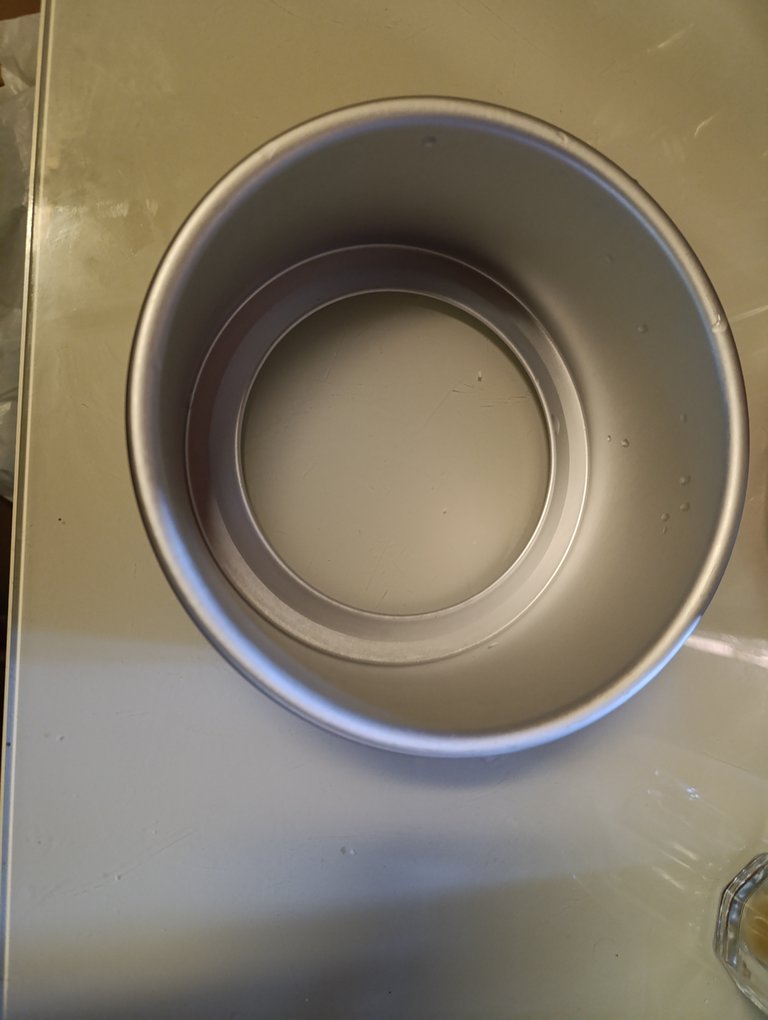
Instead of a traditional spring-form pan, we used this one with the bottom flat bottom piece that comes out.
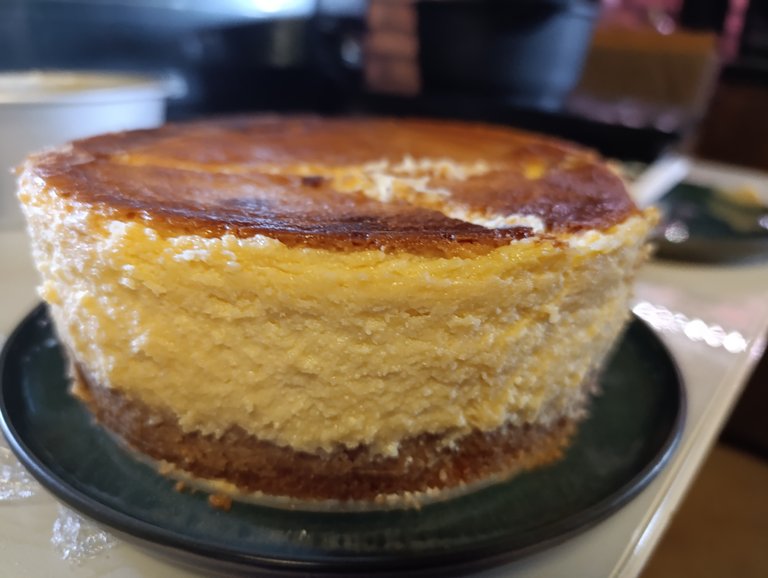
Out of the oven and cooled off, we then slid a knife gently around the edge to free it, placed a plate on the top and flipped the cheesecake out and then flipped it over again, so the crust was down on the plate. We left that center part of the pan underneath the cheesecake. Easier than possibly jacking it up by trying to take it off.

We stopped the baking and took it out of the oven even though the "jiggle test" made it look as though it had only become more liquidy even than before baking. However, the top was very golden brown and we didn't want to burn it.

It set up perfectly after spending it's time in the fridge. (Minimum 8 hrs)

Myself, I'm not big on sweets. A good NY style cheesecake has always been an exception. Especially with a nice tart fruit topping and when the cake itself isn't disgustingly over sweet.

We had some for breakfast yesterday and again today.
It came out great. When i make it again, i might still use a bit less sugar and add a pinch of salt to both the batter and the crust mixture.
Here is the final adjusted recipe.
Preheat oven to 175°
Grease w/ butter and flour:
18 cm diameter pan
7.5 cm deep
Spring-form or bottom removable type
Make Crust and parbake:
Crush up finely
6 graham crackers or equivalent
3 tablespoons melted butter
Mix well w fork
Press firmly into bottom of pan
Bake 10 minutes
Batter:
255 g mascarpone
255 g regular cream cheese
345 g of sour cream
150 g of sugar (3/4 cup)
3 eggs
3.75 ml of vanilla extract (3/4 teaspoon)
mix together your 2 types of cream cheese until creamy and lump-free without over mixing.
Add the eggs, sugar, sour cream, and vanilla extract, mixing until the consistency is smooth.
Make sure the crust and pan have cooled off.
Pour the mixture into the pan.
Have another pan or oven proof bowl
Below the rack where your cheesecake will bake. Fill that with boiling water to create a steam bath during baking
Bake for about 50-55 minutes
Top will turn golden brown and glossy
Edges will become firm..
But the center will still jiggle quite líquido looking
Let it cool and cover with plastic wrap
Refrigerate 8 hours minimum before serving.
Truthfully a good 24 hours chilling in the fridge and it is noticeably nicer.
Fruit topping:
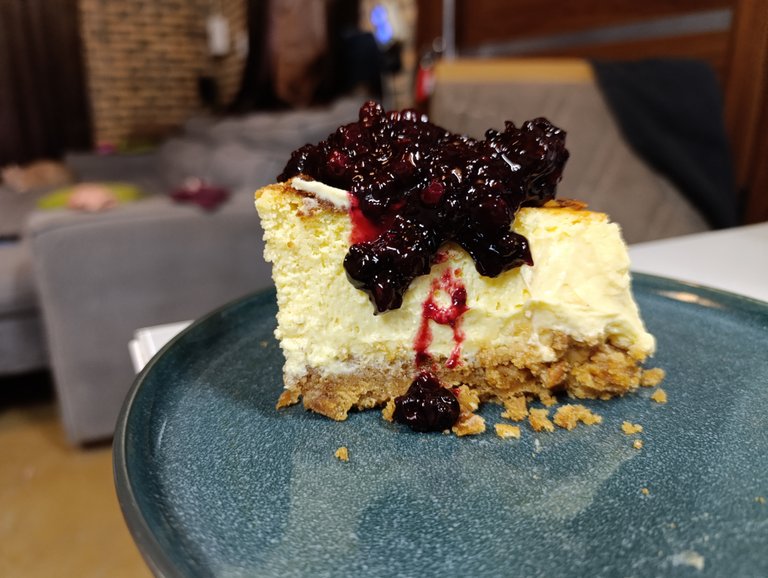
We used 2 cups of
a frozen berry blend of blackberries raspberries and blueberries strawberries because we had it.
Adding to that two teaspoons of sugar
We cooked that down for about 20 minutes on a low simmer stirring constantly.
It came out sweet and tart but not too sweet.
En Español:
Le pedimos a grok que modificara la receta original porque nos dimos cuenta de que no teníamos suficiente queso crema.
En lugar de un molde de resorte tradicional, utilizamos este con la pieza de fondo plano que sale.
Fuera del horno y después reposar para que se enfria a continuación, deslice un cuchillo suavemente debe el borde para liberarlo, colocó un plato en la parte superior y volteó la tarta de queso y luego lo hace de nuevo, por lo que la corteza estaba abajo en el plato. Dejamos la pieza central del molde debajo de la tarta de queso. Más fácil que posiblemente joderla intentando quitarla.
Paramos el horneado y la sacamos del horno a pesar de que la "prueba del meneo" hacía ver que sólo se había quedado más líquida incluso que antes del horneado. Sin embargo, la parte superior estaba muy dorada y no queríamos quemarla.
Cuajó perfectamente después de pasar su tiempo en la nevera. (Minimo de 8 horas)
Yo no soy muy dulcera. Dulce con dulce se empalaga. Una buena tarta de queso estilo NY siempre ha sido una excepción. Sobre todo con un buen siempre ha sido una excepción. Especialmente con una buena cobertura de fruta ácida y cuando el pastel en sí no es asquerosamente dulce.
Ayer desayunamos un poco y hoy también.
Está buenísimo. Cuando lo vuelva a hacer, puede que utilice un poco menos de azúcar y añada una pizca de sal tanto a la masa como a la mezcla de la corteza.
Aquí está la receta final ajustada:
Precalentar el horno a 175°
Engrasar con manteca y enharinar:
Molde de 18 cm de diámetro
7,5 cm de profundidad
Molde desmontable o de fondo desmontable
Preparar la corteza y hornear:
Triturar finamente
6 galletas graham o equivalente
3 cucharadas de mantequilla derretida
Mezclar bien con un tenedor
Presionar firmemente en el fondo del molde
Hornear 10 minutos
Masa
255 g de mascarpone
255 g de queso crema normal
345 g de crema acida
150 g de azúcar (3/4 de taza)
3 huevos
3,75 ml de extracto de vainilla (3/4 de cucharadita)
Mezcle los 2 tipos de queso crema hasta que quede cremoso y sin grumos sin mezclar demasiado.
Añada los huevos, el azúcar, la crema acida y el extracto de vainilla, mezclando hasta obtener una consistencia homogénea.
Asegúrese de que la corteza y el molde se han enfriado.
Vierta la mezcla en el molde.
Tenga otro molde o recipiente apto para horno
Debajo de la rejilla donde se horneará el cheesecake. Llénelo de agua hirviendo para crear un baño de vapor durante el horneado
Hornee durante unos 50-55 minutos
La parte superior se volverá dorada y brillante
Los bordes se volverán firmes..
Pero el centro aún se agitará con aspecto bastante líquido
Déjelo enfriar y cúbralo con film transparente
Refrigérelo 8 horas como mínimo antes de servirlo.
La verdad es que si se deja enfriar 24 horas en la nevera estará mucho más bueno.
Cobertura de fruta:
Utilizamos 2 tazas de
una mezcla de bayas congeladas de moras frambuesas y arándanos fresas porque teníamos.
Añadimos dos cucharaditas de azúcar
. Lo cocinamos durante 20 minutos a fuego lento sin dejar de remover.
Salió dulce y ácido pero no demasiado dulce.¡Buen provecho!
I write my own writing and deepl helps me to translate and improve. I make my own photos. The recipe in the original post, is in my girlfriends handwriting. It was her grandmother's recipe and i have permission and encouragement to share it with you asking with the story of her Grandma Annie. I love and literally been you for constructive criticism to improve my posts, my writing photos and allllll. Big kiss
Enjoy!
Escribo mis propios escritos y deepl me ayuda a traducir y mejorar. Hago mis propias fotos. La receta del post original, es de puño y letra de mi amigasa. Era la receta de su abuela y tengo permiso y aliento para compartirlo con ustedes pidiendo con la historia de su abuela Annie. Me encanta y literalmente sido usted para la crítica constructiva para mejorar mis posts, mis fotos de escritura y todito Un besote